
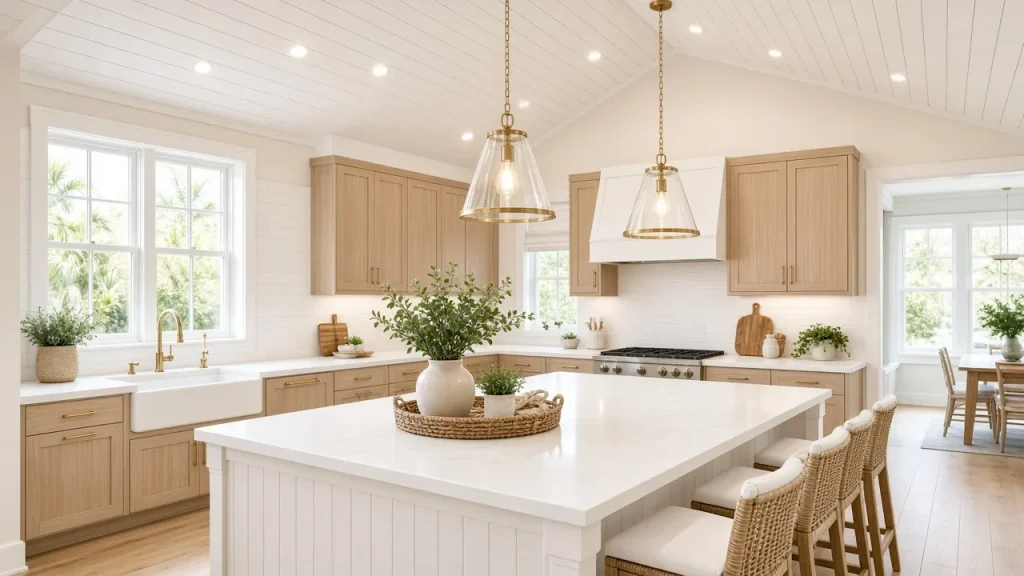
A kitchen remodel lives or dies by its lighting. You can pick the perfect cabinets and countertops, but if the light is flat, glaring or full of shadows right where you chop vegetables, the room never feels finished. In a lot of Pinellas County homes, especially ones with tall or vaulted ceilings, getting the light right takes a little planning before the drywall is closed up.
The illustration with this article shows the idea: a vaulted kitchen with recessed lights following the ceiling and pendants centered over the island. Here’s how we think through a space like that, so you can walk into your own project knowing what to ask for.
Request a quote
Tell us what you need and where you are. A licensed electrician will call or text you back to set a time. For an emergency, call (727) 476-7079, 24/7.
Start with layers, not fixtures
Good kitchen lighting has three layers, and each one has a job:
- Ambient light fills the room so you can walk through it safely and it feels open. In most kitchens that’s recessed lighting.
- Task light goes where the work happens: over the counters, sink, range and island. Pendants and under-cabinet lights handle most of this.
- Accent light is the finishing touch, such as lights inside glass cabinets, over open shelves or washing a feature wall.
When a kitchen feels “dark” even with a lot of fixtures, it’s usually because all of the light is ambient and none of it is aimed at the work surfaces. When it feels harsh, it’s usually because everything is on one switch at full brightness. Planning the layers first fixes both problems.
Laying out recessed lights so they don’t look like a runway
The most common recessed lighting mistake we see is a perfect grid down the middle of the ceiling. It looks like an airport runway and it puts the light behind you when you’re standing at the counter, so you work in your own shadow.
A better layout:
- Follow the work surfaces. Place a row of lights over the front edge of the countertops rather than the center of the floor, so the light lands in front of you.
- Space them by ceiling height. A common starting point is to space lights about half the ceiling height apart, so roughly 4 feet apart on an 8-foot ceiling. Then adjust for the beam spread of the actual fixture.
- Keep them off the cabinets. Lights placed too close to upper cabinets throw a hot spot on the doors and leave the counter dim.
- Use wafer lights where they make sense. Slim LED wafer lights don’t need a bulky can, which helps in remodels and in tight spaces between joists or trusses.
Vaulted and sloped ceilings need different hardware
Vaulted ceilings, like the one in the illustration, look great but they change the rules:
- Use fixtures made for sloped ceilings. A standard recessed light installed on a slope points the beam at an angle, and you see the glare instead of the light. Sloped-ceiling housings or adjustable (gimbal) trims let the beam point straight down.
- Follow the lines of the room. Running rows of lights parallel to the ridge keeps the ceiling looking clean and intentional.
- Plan access and heat. In Florida, attic spaces above vaulted and flat ceilings get very hot. Fixtures should be rated for contact with insulation where they touch it, and LED fixtures run much cooler than old incandescent cans.
- Think about height for pendants and fans. On a tall ceiling, pendants need longer stems or cables and the right mounting hardware. Ceiling fans need a fan-rated box and a downrod sized to the ceiling.
Pendants over the island
Pendants are task lighting and the room’s jewelry at the same time. A few rules of thumb we use:
- Height: The bottom of the pendant usually sits about 30 to 36 inches above the countertop, so it lights the surface without blocking your view across the island.
- Spacing: Center the pendants on the island, not the room, and leave enough space between them that they don’t crowd each other. Slim linear pendants work well on a long island.
- Box placement: The electrical boxes for pendants need to be placed exactly where the fixtures will hang. That’s much easier to get right before the ceiling is finished, so bring your island measurements to your electrician early.
Dimmers, controls and color temperature
- Put each layer on its own switch. Recessed lights, pendants and under-cabinet lights should be controlled separately so you can go from bright cooking light to soft evening light.
- Use LED-compatible dimmers. Older dimmers made for incandescent bulbs can make LED fixtures flicker or buzz. Matching the dimmer to the fixture prevents that.
- Pick one color temperature. Warm white (around 2700K to 3000K) feels relaxed; 3500K to 4000K looks crisper and brighter. Whatever you choose, keep it consistent across the recessed lights, pendants and under-cabinet lights so the room doesn’t look patchy.
- Consider smart switches. Smart switches and scenes let you set “cooking,” “dinner” and “night” levels and control them from your phone.
Before you start: wiring, circuits and permits
Lighting upgrades often turn into a bigger conversation once we see the wiring. More than half of Pinellas County’s homes were built before 1980 (Census ACS 2020–2024), and older homes can have overloaded lighting circuits, outdated branch wiring, or a panel without room for new circuits. Adding a remodeled kitchen’s lighting is also a good time to check that the panel and service can handle it. Our kitchen remodel electrical page covers the rest of the wiring a kitchen remodel usually needs. Work that adds new circuits typically needs a permit, and a licensed electrician should pull it and schedule the inspection. That protects you when you sell the home and with your insurance.
Why homeowners in Seminole, Largo and the beaches call us
Keywest Lights & Electric is a licensed and insured, woman-owned business based at 6248 Seminole Blvd in Seminole. We handle lighting installation of all kinds, including recessed lighting, pendants, under-cabinet lighting, fans, dimmers and smart switches, across Pinellas County and nearby parts of Hillsborough, Pasco and Manatee counties. See our Seminole electrician and Largo electrician pages for more on the work we do close to home.
- 2-year workmanship warranty (5 years for Member Care Plan members)
- Member Plans: 7% off labor and materials, for members only
- Financing available through Acorn Finance, subject to credit approval
Planning a kitchen remodel or just tired of a dark kitchen? Call (727) 476-7079 or request service online and we’ll help you lay out the lighting before the drywall goes up.
Frequently asked questions
How far apart should recessed lights be in a kitchen?
A good starting point is about half the ceiling height, so around 4 feet apart on an 8-foot ceiling. The right spacing depends on the fixture’s beam spread and where the counters are, so we lay lights out over the work surfaces rather than in a grid.
Can you put recessed lights in a vaulted ceiling?
Yes. Use housings or adjustable trims made for sloped ceilings so the light points straight down instead of glaring at an angle.
How high should pendants hang over a kitchen island?
Usually about 30 to 36 inches from the countertop to the bottom of the pendant, adjusted for the fixture size and the people who use the kitchen.
Do I need a permit to add recessed lighting?
Work that adds new circuits typically needs a permit. A licensed electrician should handle the permit and inspection.
Can you add recessed lighting without tearing out the ceiling?
Often, yes. Slim LED wafer lights are designed for retrofits and usually go in through small openings, depending on what’s above the ceiling.